How to Build a Shelter: Techniques for Emergency Situations
Key Takeaways
- Identify a safe, elevated, and dry location away from hazards like falling branches or flooding
- Use natural materials (branches, leaves, bark) to construct quick shelters when gear is limited
- Practice building a simple lean-to for fast protection from wind and rain
- Create a debris hut for warmth by insulating with leaves, grass, and soft forest materials
- Use a tarp or emergency blanket to build an A-frame shelter when available
- Focus on insulation from below by creating a thick bed of leaves or pine needles
- Ensure ventilation to avoid moisture buildup inside the shelter
- Reinforce structures with sturdy branches to withstand wind
- Keep the shelter entrance facing away from strong winds for added comfort
When you find yourself facing an emergency in the wild or an unexpected situation, having the knowledge to build a shelter can be a lifesaver. You might think it’s complicated, but with the right techniques, you can create a safe, warm, and dry space using simple materials around you.
This guide will show you easy-to-follow methods that anyone can use, even if you’ve never built a shelter before. By learning these skills, you’re not just preparing for the worst—you’re gaining confidence to handle whatever nature throws your way. Ready to discover how to protect yourself and stay safe?
Let’s dive into the essential techniques for building a shelter in emergency situations.
Essential Shelter Skills
Knowing essential shelter skills can save your life in an emergency. These skills help you create a safe and warm space quickly. Understanding key techniques improves your chance of survival in the wild. Focus on practical steps that anyone can follow, regardless of experience.
Planning And Visualization
Start by assessing your environment and available materials. Imagine the shelter shape and size before building. Visualize how it will protect you from wind, rain, and cold. Planning helps you use resources wisely and avoid mistakes. Think about shelter location for safety and comfort. Clear the area of sharp rocks and debris. Visualizing your shelter saves time and energy during construction.
Problem-solving In The Wild
Expect challenges like limited materials or harsh weather. Use creativity to adapt your shelter design. For example, use fallen branches for support if no tools are available. Look for natural shelters like caves or fallen trees. Combine natural features with your construction for better protection. Stay calm and focus on one step at a time. Problem-solving skills help you overcome unexpected obstacles effectively.
Choosing Shelter Location
Choosing the right location for your emergency shelter is crucial for safety and comfort. The site affects your protection against weather, insects, and wildlife. Picking a good spot can make your survival easier and keep you warm and dry.
Assessing Terrain And Weather
Look for flat ground to build your shelter. Avoid low spots where water can collect after rain. Check the wind direction to place your shelter away from strong gusts. Consider the sun’s path to get warmth during the day. Choose an area that stays dry and is safe from falling branches or rocks.
Finding Natural Features
Use trees, rocks, or hills to block wind and rain. Natural features can add extra protection and save building time. A large tree with a strong trunk can shield you from rain. Rocks can serve as walls or windbreaks. Hills can stop cold air from settling around your shelter. These features also help hide your shelter from animals or other dangers.
Basic Shelter Types
Basic shelter types form the foundation of emergency survival skills. Knowing these types helps you create a safe place quickly. Each shelter type suits different environments and materials. Learning their features prepares you to adapt in any situation.
Choosing the right shelter depends on weather, available resources, and time. Simple designs often provide the best protection. These shelters keep you dry, warm, and safe from wind and cold.
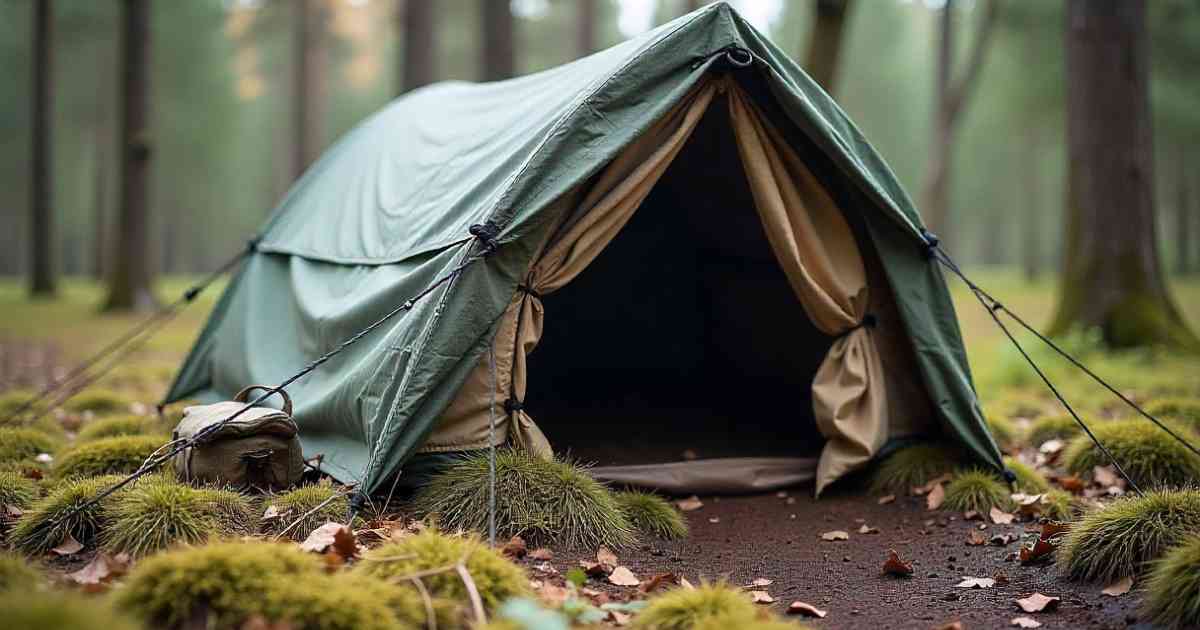
A-frame Shelters
A-frame shelters have a triangular shape. They use two poles or branches to form the frame. Lean smaller branches or leaves against the frame for walls. This design sheds rain and snow well. It keeps the shelter stable and strong. A-frame shelters are quick to build with limited tools.
Debris Huts
Debris huts use natural materials like leaves, sticks, and grass. Start by making a frame with a long stick propped on one end. Cover it with large branches, then pile thick debris on top. This trap air for insulation and warmth. Debris huts blend into the environment. They work well in forests or woodlands.
Natural Shelters
Natural shelters use existing formations for protection. Examples include caves, rock overhangs, and fallen trees. These need little construction and offer quick refuge. Check for safety and stability before using. Add extra insulation using leaves or branches. Natural shelters are excellent for conserving energy and time.
Building Materials
Choosing the right building materials is crucial when creating an emergency shelter. The materials must provide protection, insulation, and durability. Nature offers many resources that are easy to find and use. Using natural elements can make the shelter blend into the environment and stay sturdy.
Using Branches And Leaves
Branches form the frame of a shelter. Look for strong, flexible branches that can support weight. Use smaller branches to fill gaps and create walls. Leaves add insulation and cover. Collect plenty of dry leaves to keep the shelter warm. Layer leaves thickly to block wind and rain.
Incorporating Moss And Ferns
Moss and ferns work well as soft insulation. They trap heat and keep moisture out. Place moss inside the shelter walls or on the floor for comfort. Ferns add an extra layer of protection. Both materials are lightweight and easy to find in forests or damp areas.
Waterproofing With Bark And Tarps
Bark can shield your shelter from rain. Large pieces of bark are excellent for roofing. They are natural, strong, and water-resistant. If you have a tarp, use it to cover the top of the shelter. Tarps provide quick and reliable waterproofing. Secure tarps tightly to avoid wind damage.
Insulation And Warmth
Keeping warm is critical when building a shelter in an emergency. Heat loss can cause hypothermia and other serious problems. Insulation and warmth techniques help trap body heat and block cold air. Simple materials found in nature or survival kits can create effective barriers. Focus on layers and reflective surfaces to maximize heat retention.
Creating Insulation Layers
Layering materials is key to good insulation. Use leaves, grass, pine needles, or moss to form thick padding on the shelter floor and walls. These natural layers trap air and reduce heat loss. Add dry clothing or fabric between layers for extra warmth. Make sure materials are dry to avoid cold and dampness. The thicker the layers, the better the insulation.
Reflective Blankets And Body Heat
Reflective blankets are lightweight and very effective for warmth. They reflect body heat back to you, keeping cold out. Place a reflective blanket inside your shelter or wrap it around your body. Combine with natural insulation layers for best results. Reflective materials can double the warmth and help conserve energy. Always keep your head covered to prevent heat escape.
Quick Shelter Techniques
In urgent situations, building a shelter quickly can protect you from harsh weather and increase your chances of survival. Quick shelter techniques focus on speed, simplicity, and using what is available around you. These methods help you create a safe space with minimal effort and time.
Rapid Construction Tips
Start by choosing a safe location, away from hazards like falling branches or flooding. Use natural features like rocks or fallen trees as part of your shelter. Keep the design simple—lean a sturdy branch against a tree or create a basic frame. Cover the frame with leaves, branches, or a tarp to block wind and rain. Work steadily and avoid overcomplicating. A small, well-built shelter is better than a large, unfinished one.
Adapting To Limited Resources
Use what nature provides. Gather dry leaves, pine needles, or grass for insulation. If tools are missing, use your hands to break small branches and weave them together. In cold weather, build your shelter near natural windbreaks. If fabric or plastic is available, use it for waterproofing. Think creatively to replace missing materials. Focus on protection and warmth over comfort.
Frequently Asked Questions Of How to Build a Shelter: Techniques for Emergency Situations
What Skills Do You Need To Build An Emergency Shelter?
You need skills in planning, problem-solving, basic construction, using natural materials, and ensuring weather protection. Quick decision-making helps.
How Do You Build A Simple Emergency Shelter?
Build a simple emergency shelter by selecting a sturdy frame like branches. Cover it with leaves or a tarp for insulation. Ensure it protects from wind and rain. Choose a dry, flat spot. Keep the shelter compact and secure for warmth and safety.
What Is The Easiest Survival Shelter To Build?
The easiest survival shelter to build is an A-frame shelter. It requires minimal tools and materials like a tarp and branches. This simple design offers quick protection from wind and rain, making it ideal for emergency situations.
What Makes A Good Emergency Shelter?
A good emergency shelter is lightweight, durable, easy to build, weatherproof, and suits the terrain and number of occupants.
Conclusion
Building a shelter quickly can save your life in emergencies. Use simple materials found nearby, like branches and leaves. Choose a safe spot away from hazards and wind. Keep your shelter small to stay warm and conserve energy. Practice building different shelters to improve your skills.
Remember, staying dry and warm is the top priority. With basic techniques, anyone can create a safe place to wait for help. Stay calm, act fast, and use your knowledge to protect yourself. Being prepared makes a big difference in survival situations.


